Easy, 3-Part Lebanese Meal
Falafel, Mujaddarah & Lubee
The perfect fast, easy and something-other-than-the-usual-dinner dinner! I reached back to my Lebanese roots for this one, making slight twists to family recipes, to make this entire Middle Eastern meal in just two hours. Minimal effort, minimal time and delicious results. What more could anyone ask for?!
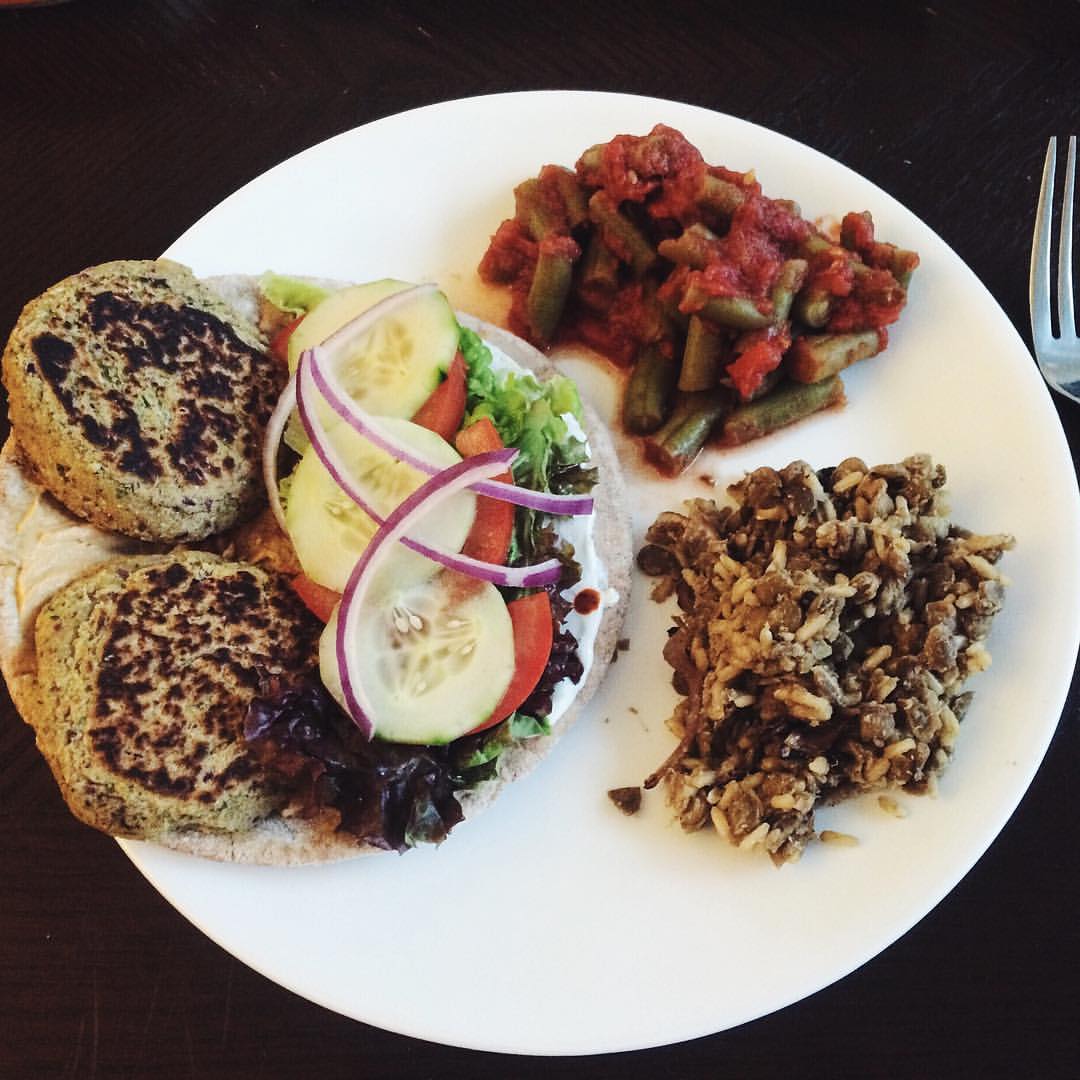
Left: Falafel Sandwich. Top: Lubee (Green Beans & Tomatoes). Bottom Right: Mujaddarah (Lentils & Rice).
Things you will need: kitchen knife, cutting board, 1 mixing bowl, food processor, 1 large skillet, 1 medium skillet, can opener, colander/strainer, 1 large pot, measuring utensils, spatula, spoons for stove top mixing, spatula for stove top flipping, serving plate & serving bowls, paper towels
Falafel
(Chickpea Patties)
Other things you will need: kitchen knife, cutting board, 1 mixing bowl, food processor, 1 medium skillet, can opener, colander/strainer, measuring utensils, spatula, spatula for stove top flipping, serving plate & paper towels
Method
1. Add ingredients chickpeas through sesame seeds to a food processor. Blend to make a crumbly dough.
2. Add flour 1 tbsp at a time until dough is no longer wet and can be molded. I used 5 Tbsp total.
3. Optional, if you have time: Transfer to mixing bowl and let sit in fridge for 1-2 hours. This makes it easier to mold into patties
[If you’re making this whole meal: This is where I start making the mujaddarah. Once I’m in step 5 of that, when the lentils and rice are cooking together, I’ll start forming the patties.]
4. Divide dough into ½ inch thick patties (either regular or mini sized). I like to make regular sized patties about the size of my palm.
Best way to form patties: Take a large spoonful of dough and roll between your hands into a good-sized ball. Squish the ball into a ½ inch thick frisbee. Make sure the edges are solid with no cracks.
[If you’re making this whole meal: By this time I’m finished with the mujaddarah and have most of the patties formed. Before frying the falafels, I’ll put the lubee on the stove since you simply compile it and basically let it sit, with the occasional stir.]
5. Heat 1-2 Tbsp oil (or enough to coat entire pan) in large nonstick skillet on medium heat. Once heated, place patties in and cook long enough until brown on both sides, about 5-7 minutes total. Once they’re browned, transfer to a plate lined with paper towel (this soaks up the excess oil).
6. Serve with pita, hummus, yogurt-dill sauce, tomatoes, lettuce, onion and cucumber.
This makes about 12 patties, so about 6 sandwiches (think 2 patties per pita).
Yogurt-Dill Sauce
Mujaddarah / Mujadara
(Lebanese Lentils & Rice with Caramelized Onions)
Other things you will need: kitchen knife, cutting board, 1 medium skillet, colander/strainer, 1 large pot, measuring utensils, spoon for stove top mixing, serving bowl
Method
1. Prepare all your ingredients, since a lot of of the steps are done simultaneously.
- Thinly slice onion
- Place lentils in colander or strainer in sink to get ready to rinse
2. Bring 5 C water to a boil in a large pot. This will be used for the lentils (and then the rice!) .
3. While the water is boiling, start the onion caramelization process!
Heat 2 tbsp oil in medium nonstick skillet over medium heat. Once heated, add onions and saute, stirring frequently, for 10-15 minutes. After about 10 minutes I turned my heat to medium-low, so they would caramelize and not burn. Turn off burner and set onions aside until the lentils are ready.
4. Once you notice the water getting ready to boil, rinse the dried lentils. Once the water on the stove is boiling, add the lentils. Let simmer uncovered for 20 minutes, stirring occasionally.
Now that the onions are caramelized and lentils have been in a nice hot tub for 20 minutes, we’ll start to compile the mujaddarah!
5. Add the 1 c uncooked rice and ½ of the caramelized onions to the pot of lentils. For the next 20 minutes, these will all cook together. You may notice more water may need to be added. Right away when I put all the ingredients together, I add an additional 1 C of water.
Stir the pot occasionally. If you notice it is getting dry, add a little more water. REMEMBER, You don’t want this to be a stew though--It is a side dish of rice and lentils, so too much water is a no-no.
6. After 15 minutes of cooking, I usually add another ½ C of water. Here is where I add in the cayenne pepper (optional if you don’t want the heat!) and stir together.
7. Once the 20 minute stove top party is over, remove the pot from heat and place in your serving dish. Add the remaining ½ of the caramelized onions to the top of the dish.
This makes about 6-8 servings.
Lubee
(Lebanese Green Beans)
Other things you will need: kitchen knife, cutting board, 1 large skillet, spoon for stove top mixing, serving bowl
Method
1. Heat large nonstick skillet over medium heat. Add frozen green beans and stir occasionally until thawed.
2. Once green beans are thawed, add cinnamon and cumin and mix together. The tomatoes are feeling left out, so add the crushed canned tomatoes and freshly diced tomato into the mix. Mix it all together and increase the heat to bring to a boil.
3. Once it’s to a boil, lower to a simmer and keep it there for about 15 minutes, stirring occasionally. I don’t think this could get any easier….After 15 minutes, remove from heat and serve warm!
This dish tends to be pretty hot once it’s all blended together (think like when you’re making soup). I usually let it sit for about 5 minutes to cool a little before serving.
This looks like a heaping dish of green beans, but it serves about 6-8!